Another versatile piece from the Big B!
Our latest tester, Joe Ciach, is testing the Brunswick C-System Versa-Max. Joe has an impressive and very long resume including 9-time Team Canada Member. He was the 2010 Players Tour Champion in the Greater Toronto Area, World Cup in 2008, and countless tournament wins. Joe is a right-handed rev-speed matched power stroker. We performed the test on the 42 foot Kegel Stone Street pattern. This is a longish, medium-heavy THS pattern.
First Impressions
The ball is aptly named. It is very clean through the fronts and makes a consistent booming move on the backend. I want to compare this ball to the Wicked Siege in terms of versatility, but is probably punchier on the backends.
Price 9/10
The Versa-Max is a mid-price ball and offers good value for the money.
Core
The Dual Flip I-Block core has an RG of 2.54 and differential of .052. It creates a relatively strong but smooth move at the breakpoint.
Cover 8.5/10
This cover continues the C-System technology for Brunswick. They finished this in 500 Siaair, Rough Buff, then High Gloss. They’ve designed this cover to be very clean through the heads and it is. This allows for good energy storage so the ball makes a nice move at the breakpoint. The ball was designed for medium to medium-light conditions which will really allow it to be very versatile. That’s because most of the time, these are the conditions that bowlers face on THS. It is not ideal for medium-heavy conditions, but it was playable nevertheless.
Reaction 9/10
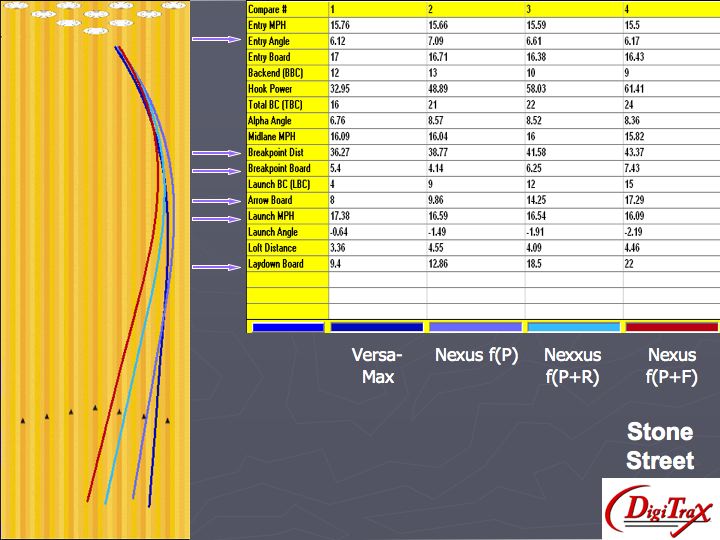
Since we tested this on a 42 pattern which is a little bit heavier and longer than what we typically see, this ball was playing relatively direct. While I would normally not tell bowlers this would be the best choice for this condition, it truly rolled well and showed it’s consistency and predictability. You will see in the videos the more direct line. Joe doesn’t typically bowl that direct. However, he was still able to strike at will from this line with this ball. This ball really does remind me of the Wicked Siege, but just a touch longer and more angular.
We tested this ball alongside the 3 Nexus balls, Nexus f(P), Nexus f(P+F), and Nexxus f(P+R). This ball played the most direct. However, it played more consistently then the more angular Nexus f(P) pearl. While the Nexus pearl was over/under on this pattern, this ball did admirably. You can also see that the ball had an earlier breakpoint than the rest, but still generated over 6 degrees of entry angle which allows it to enter the pocket with good strength and continuation.
You can see the Digitrax analysis below.

Overall 9/10
This is one of those balls where if you had to have just one, it qualifies as a good candidate. It may not be the best choice on the heavier patterns, but is definitely consistent and predictable. When you face medium and medium-light conditions, which is most of the time, this ball can easily play all night.
Versa-Max Video
Brunswick Comparo


04/23/12
I got a Versa Max about a month ago, my first Brunswick ball. Right away, I found it has a strong, consistent roll that’s easy to read. So I started throwing the VM in my leagues.
I like to play the middle with inside shots and discovered the VM can be thrown along the same line through 3 league games of 10-players. Changing head and backend conditions don’t seem to bother it much, and it’s forgiving to my slightly left or right target misses. If traffic the middle is too heavy, I take it to the less travelled far right and throw down and in shots. I have full confidence in this ball.
The layout I used was Brunswick’s recommendation for High Track Length and Back-End. For me, this has worked out great. It allows several hooking lines into the pocket, plus the option of rolling a straighter ball. As a result, I’m getting more strikes and my “open” count has gone down. My last few series averages have gone up considerably.
An equal-average bowler on an opposing team thought I was throwing the other black beauty, and so did one of my teammates. They both bought this other ball thinking it would better their games too. Yes, that other ball has helped their games as well, but the +30% price difference has yet to demonstrate any significant performance advantages over my Versa Max. Another bowler found out what I really had, bought one, and now he’s getting the same results as I me even though he’s a hardcore cranker.
If anything, we both agree the Versa Max is underrated.
Other Comments:
Because of my slower speed and low revs, I took the VM’s OOB finish up to a 2-sided 1000-Abralon + 4-sided 2000-Abralon and then reapplied a coat of polish. This alteration and the layout have helped my scoring as much as the VM’s inherent dynamics.
Some balls soak up more oil than others, and they do so at different rates. With about 30 games on it so far, my VM is still “dry”. By comparison, another ball I have was sweating oil at 8 games, though it cleaned very quickly, and yet another takes a long time to de-oil. (I built my own ball incubator for de-oiling, and it works very well; more info if you want it.)
For some reason, my VM sometimes shows belt marks from the return mechanism. These buff off easily between frames, leaving a fresh surface. This is unlike any of my other balls, and definitely is not from the polish. Any ideas? (Happens on different lanes, not just one machine.)
I bowl 2 leagues a week at the same center that puts down the same pattern on freshly cleaned lanes — 38′ with 26-units of oil tapering to the outside 6 boards. I bowl another league at another center, always a day-old, 2nd shift, 41′ pattern. The Versa Max performs equally well at both centers.
Do I alternate balls during league? No, except for shooting standing 10-pins. Everyone brings several balls, then uses their same favorite one week after week. I’ve grown into the same habit.
I truly believe this is the most versatile ball in Brunswick’s lineup. A lot of people will be happy with this piece.
I saw you artical about your incubator am interested please send imfo about it thank you Bob
Bob — Here’s my info (most of it, anyway). Sorry about taking so long to get back to you. If you have any questions, I’ll try to be more timely with replies:
Urethane balls will not absorb lane oil. Reactive resin balls do but at different rates and volumes. Given regular de-oiling, a ball’s coverstock reaction will be consistent. If your ball has soaked up a lot of oil, it’s freshly de-oiled reaction will not be what it was beforehand.
Popular DIY de-oiling methods include regular use of a dishwasher, oven, sink or tub, and the misbegotten bucket system that uses mild dish soap and a series of hot/hotter/really hot water dunkings. Otherwise, there are the fee-based professional services that use expensive machines. The typical DIY methods are nearly cost free, but they’re not nearly as thorough as commonly believed — though they do maintain a certain level of consistency. Professional services are quick and very effective, but de-oiling a number of balls can get expensive. For thorough, low cost de-oiling, a homemade ball incubator is an alternative maintenance method.
Building a ball incubator is relatively easy and inexpensive. The upsides: it’s a simple, clean, low risk method that yields very effective results. The downside: it takes time, because it involves a slow heating and cooling process. Once you’ve gained some experience with one, you’ll find it much faster to de-oil each ball in your arsenal. The key is knowing the ball’s “target temp”, which is when it starts sweating what oil is in it.
I got my idea for a ball incubator after an accidental discovery of how ineffective the ball dunking system works. After my last use, I set the ball out to dry in a window sill. Indirect sunlight hit it, and the coverstock began to sweat oil again at a warm surface temperature — but only on one side, of course. It then occurred to me to build an incubator like the ones he uses to hatch eggs. A Web search on Egg Incubators led to all sorts of sites that are full of adaptable information and ideas, and I suggest you do the same.
Here’s how I made a very basic ball incubator. Its simplicity works just fine, but an optional master electrical timer would be a great addition and make it almost automatic.
Materials:
(1) camping cooler with a tight lid and drain hole, big enough to hold 2 balls (an “Igloo” is well insulated and made of high-grade plastic)
(1) 16-ga extension cord (short length, three wire type including a ground leg)
(1) 40-watt incandescent light bulb
(1) surface-mount, pull-chain type light fixture (as found on closet ceilings, etc. Pull-chain is optional. (ceramic or plastic.)
(1) metal 4″x4″ electrical fixture mounting box with grounding screw
(1) cable connector (threaded metal type)
(1) 10″x10″ piece of “roof flashing” bent at 60* to 90* (any thin metal will do)
(1) high quality thermometer or an infra-red temperature gauge (for about $25, a good “pocket” gauge can be found at most heating supply companies and a cheap one at Radio Shack)
(1) up/down counting timer (as used in baking)
(1) plastic pet-food bowl (if metal, one with a rubber rim!)
(1) baby diaper, or any highly absorbent cloth, cut to 6″ square
(1) bottle of ball cleaner (Do not use a highly flammable mixture! Kegel brand is excellent.)
(1) microfiber wiping towel (look for a high “Polyamide” content!)
Option: 6-hour electrical timer (by Intermatic or similar)
Assembly:
Attach the cable clamp to a side knock-out hole of the mounting box using (not the back). Cut off the female end of the extension cord and strip the outer sheathing back about 5″. Insert the wires through the cooler’s drain hole then through the clamp and out of the mounting box. Attach the negative and positive wires to the fixture (negative wire is white and goes to silver screw; positive is black or red and goes to bronze screw). If not provided for on the fixture, attach the ground wire to the mounting box (ground screw is green). Attach the fixture to the mounting box. Pull most of the wire-slack out of the mounting box. Tighten the cable clamp to “snug” around the main wire sheathing of the cord (i.e, not the wires). Place the wired fixture, pointing up, on the bottom of the cooler at the drain end. Install the bulb. To test, plug the male end of the wire into an outlet.
Timer Option Note: Run the extension cord to the timer first, then into the cooler as described above. Using an electrical timer will require an additional mounting box and two more cable clamps. The timer comes with complete instructions.
Usage:
Keep records for each ball. Some balls will de-oil at a lower temperature than others, and therefore require less time. Some balls will absorb less oil than others. Don’t pre-judge an expected amount of oil discharge — claims of high discharge are often grossly exaggerated.
Place the cooler/light assembly in a spot where it won’t be moved or disturbed. Place the bowl at the other end of the cooler and the 6″ diaper over the bowl. The bowl will support the ball, and the diaper will soak up the oil.
Place the 90* bent metal so it stands upright between the light and the bowl; direction of bend doesn’t matter. This acts as a heat deflector, allowing the ball to heat more evenly. It’s not necessary to attach the metal deflector to the cooler.
Place ball onto bowl and diaper, with finger holes pointing up as a starting position reference. Place thermometer in a back corner near the ball, behind the heat deflector. Turn light on and close cooler lid. Set timer’s alarm to 45-min and start timer.
After 45-min, note the temperature and rotate the ball 180* (holes now pointing down). If using an infra-red gauge, note the ball’s top surface temp first, then rotate the ball, and note the reversed top surface temp again. Reset timer to second cycle of 45-min.
Ball will heat evenly and slowly — be patient and allow the process to continue naturally. Eventually, it will begin to sweat oil. The amount of elapsed time depends upon the ball’s initial temperature. At first, the surface will appear more glossy than before. As the temp increases, the ball may even appear damp or wet. When this happens, it’s important to note the elapsed time and temperature for each particular ball. This way, a “target” time/temp can be established.
At the target temp, the majority of absorbed oil will reach the surface. At this point, wipe the ball down slowly and methodically with a clean, dry towel or two. Dirty towels will transfer oil, not remove it. Return the ball to the incubator for another 10-min.
At this point, remove the ball and apply a generous amount of ball cleaner. Wipe the ball down again, slowly but efficiently. The ball’s surface will cool fairly quickly. If not wiped down thoroughly, any residual oil will be reabsorbed.
Finally, turn the light off and return the ball to the incubator. Allow enough time for the ball to cool to its original temperature. Remember, this process has the potential of heating the entire ball, including its core and coverstock. Cores and Coverstocks are not the same materials and can separate if the heat coefficients are too dissimilar.
_________
Random Notes:
Once the “target temp” is reached, surface oil will begin to sweat from the coverstock. At this point, higher temps are not going to be more effective.
A diaper will absorb some of the oil, but as the sweating process continues you should also occasionally wipe down the entire ball using a slow hand — not in a rapid “burnishing” way, and always use a fresh, dry towel.
Once the majority of oil has sweat out and been wiped off, then is the time to use a ball cleaner. The cleaner will thoroughly neutralize the remaining oil, and you’re done — except for letting the ball cool naturally — which it will do fairly quickly even when left in the incubator.
Target Temperatures: I have 6 balls, high gloss to sanded solid, made by various manufacturers. They each absorb oil at different rates and will begin to sweat oil at different temperatures. One will sweat oil after 8 games at around 112*. Another begins sweating after 20 games at 95*. One ball has over 30 games on it and is still dry. 120* is the maximum necessary temp.
Left in a good cooler overnight, a 40w incandescent bulb will bring a 72* room temp ball up to 151*. The ball will then appear dry, as all the oil has dissipated from the coverstock, but I absolutely do not recommend doing this.
If a ball gets too warm, its resins will begin to liquify.
Get a ball too warm, and gravity will put it out of round.
At a sustained interior temp of 150*, my cooler’s plastic form still did not warp.
I have not tried using a 60w or higher bulb as a heat source. It seems unnecessary.
The heat will distribute itself fairly evenly, but left unrotated the bottom of the ball will be cooler. Given a couple of rotations, the ball will be evenly heated. No big deal.
You can also buy an optional thermometer that will keep the ball at an even temp for as long as desired, but accurate ones are kind of pricey.
Kitchen ovens and dishwashers have thermometers, but they are notoriously inaccurate and have wide ranges of actual on/off temps!